

You may be rehearsing your smile in the bathroom mirror, turning your head toward the window, then the overhead light, wondering whether a chipped edge, a gap, or a darkened tooth is finally worth treating. At the same time, you may be weighing the permanence of enamel preparation against the appeal of seeing a more even smile relatively soon.
The porcelain veneers process isn't a single cosmetic appointment. It's a sequence of decisions involving diagnosis, smile design, tooth preservation, temporary restorations, laboratory communication, bonding, and ongoing protection. The most important choices aren't made while you're sitting passively in the dental chair. They're made when you describe what you want, approve the proposed shape, question how much enamel will be removed, and commit to caring for the result.
This guide follows the journey from the first consultation through the final bond, with attention to what each stage feels like, what can go wrong, and what you can control. For another perspective on candidacy and alternatives, see this discussion of whether porcelain veneers may be right for you.
Standing in Front of the Mirror Before the First Appointment
A prospective veneer patient often arrives with a very specific private routine. They smile, relax their lips, check the front teeth from the side, and take photographs that never leave their phone. One person focuses on a small chip that catches the light. Another notices uneven lengths when speaking. Someone else has lived with discoloration that whitening never corrected.
Those concerns matter, but the mirror can't tell you whether a veneer is the right restoration. It can't reveal hidden decay, gum inflammation, an unstable bite, or a tooth that needs a crown rather than a facial ceramic shell. A responsible dentist has to assess the health and function underneath the cosmetic complaint before discussing the final appearance.
The emotional trade-off is real. You want an immediate visual change, yet the responsible process usually involves planning, provisional teeth, laboratory fabrication, and a review appointment. Moving quickly can feel attractive, but speed doesn't replace diagnosis or give you more opportunities to correct an unsuitable shape before ceramic is bonded.
Practical rule: If a practice treats your smile as a product to select rather than a design to test, ask more questions before committing.
Your influence begins before preparation. Bring photographs of smiles you admire, but also bring a clear description of what bothers you functionally. Sensitivity, repeated chipping, clenching, difficulty flossing, and discomfort when biting may change the treatment plan. Ask what happens to your enamel, how the temporary veneers will be evaluated, which laboratory will fabricate the ceramic, and what protection you'll need afterward.
The rest of the porcelain veneers process is best understood as a map of those decisions. Case selection, enamel preservation, provisional feedback, and long-term maintenance all affect whether the finished smile looks natural and continues to function comfortably.
The Consultation and Smile Design Conversation
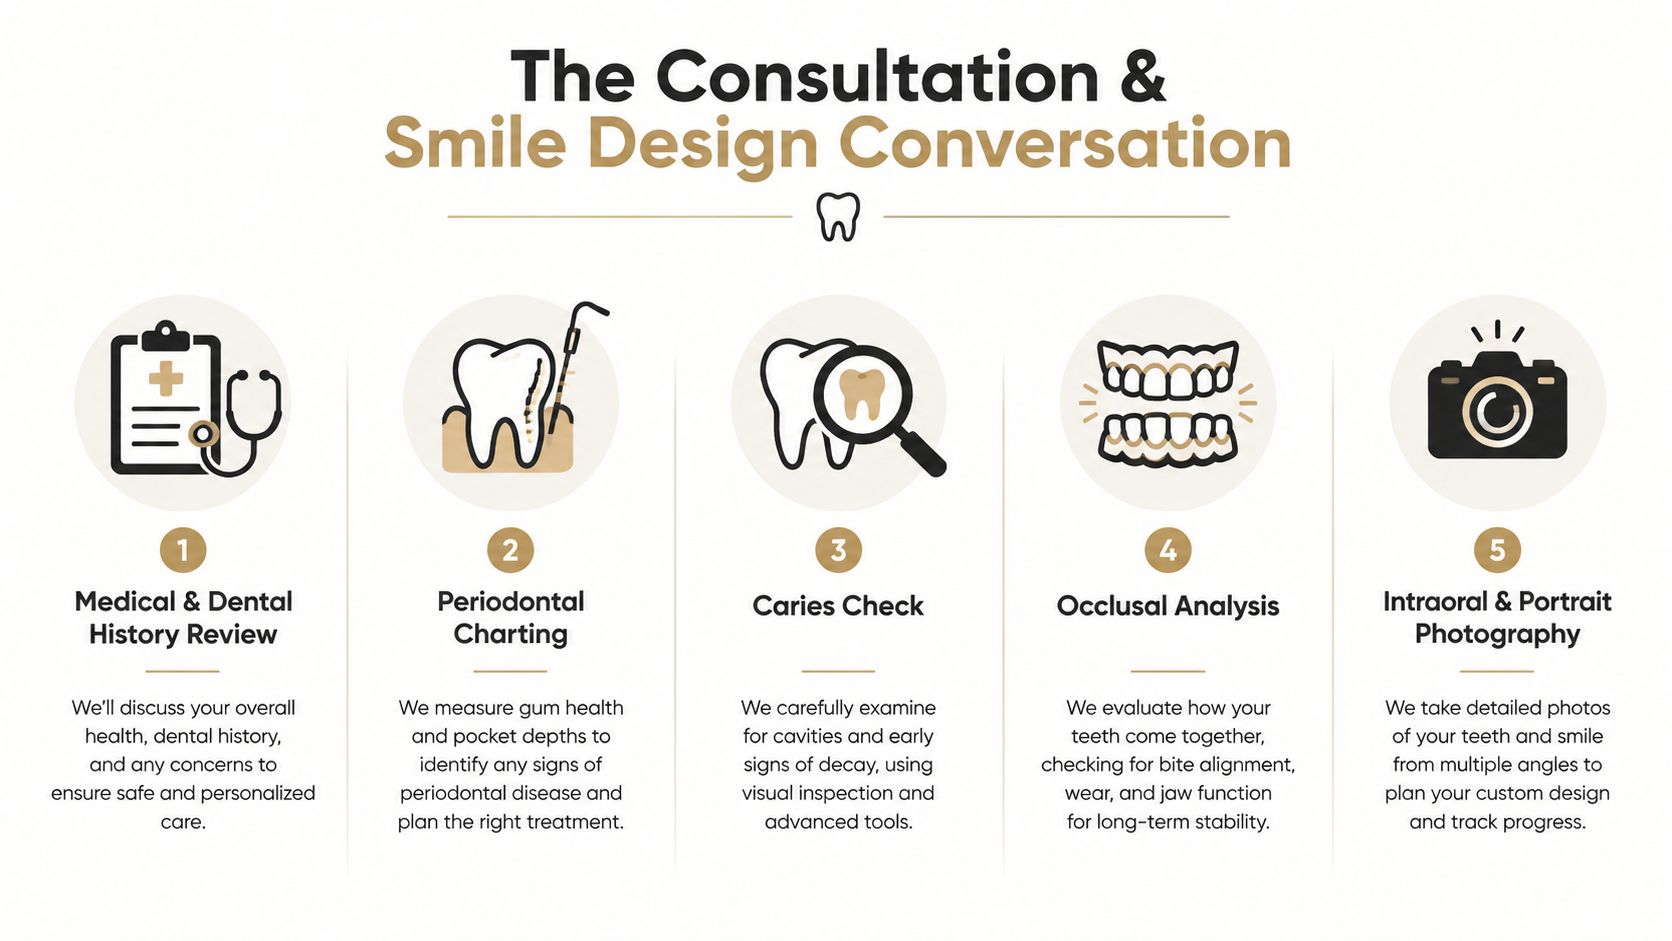
The first appointment should feel like an examination and design meeting, not a sales presentation. The dentist reviews your medical and dental history, examines your teeth and gums, checks for decay, and studies how the upper and lower teeth meet. Photographs, portrait images, and either study models or a digital scan help connect the teeth to your face rather than treating each tooth as an isolated object.
The clinical review usually includes:
- Periodontal assessment: Gum position, inflammation, symmetry, and the space available around the proposed veneers.
- Caries and structure check: Decay, cracks, old fillings, discoloration, and the amount of sound enamel remaining.
- Occlusal analysis: How the teeth contact during closing, movement, chewing, and possible clenching.
- Facial and lip evaluation: Lip movement, tooth display, midline, gingival symmetry, and the way the smile changes while speaking.
- Photographic records: Intraoral and portrait images that allow the team and laboratory to compare proportions, shade, and expression.
A dentist may recommend treating gum disease, replacing a failing filling, aligning teeth, or choosing a crown before veneers. Patients with heavily restored or structurally compromised teeth may need a different restorative design. The distinction between cosmetic and restorative treatment is explored further in restorative and cosmetic dentistry.
What to bring to the appointment
Bring three useful categories of information:
- Visual references: Images that show the degree of brightness, tooth length, texture, and translucency you prefer.
- Functional complaints: Notes about chips, sensitivity, worn edges, food trapping, or jaw tension.
- Decision questions: Ask whether no-preparation or minimal-preparation treatment is realistic, what alternatives exist, and how much enamel would be removed.
The visit should lead to a diagnostic wax-up, digital mock-up, or both. You should be able to see a proposed direction in two or three dimensions, assess how it affects your lips and speech, and request changes before preparation begins. Approval of that design is a meaningful checkpoint. Tooth preparation shouldn't start just because you attended a consultation.
Tooth Preparation and Digital Impressions
Tooth preparation is where aesthetic ambition meets biological restraint. Contemporary veneer treatment often aims to remain within a thin enamel window, but the exact reduction depends on the tooth's position, existing restorations, desired color change, and the shape and thickness required by the laboratory. The common range described in the treatment plan may be 0.3 to 0.5 millimeters, but the number alone doesn't determine whether a case is conservative.
The important question is where that reduction ends. A systematic review of 6,500 veneers reported a 10-year cumulative survival rate of 95.5%, with enamel preservation and adhesion identified as central technical factors in long-term performance (systematic review of ceramic veneer survival). A separate review found that veneers bonded to enamel had fewer complications and lower failure rates than those bonded to exposed dentin (2024 review of enamel and dentin bonding).
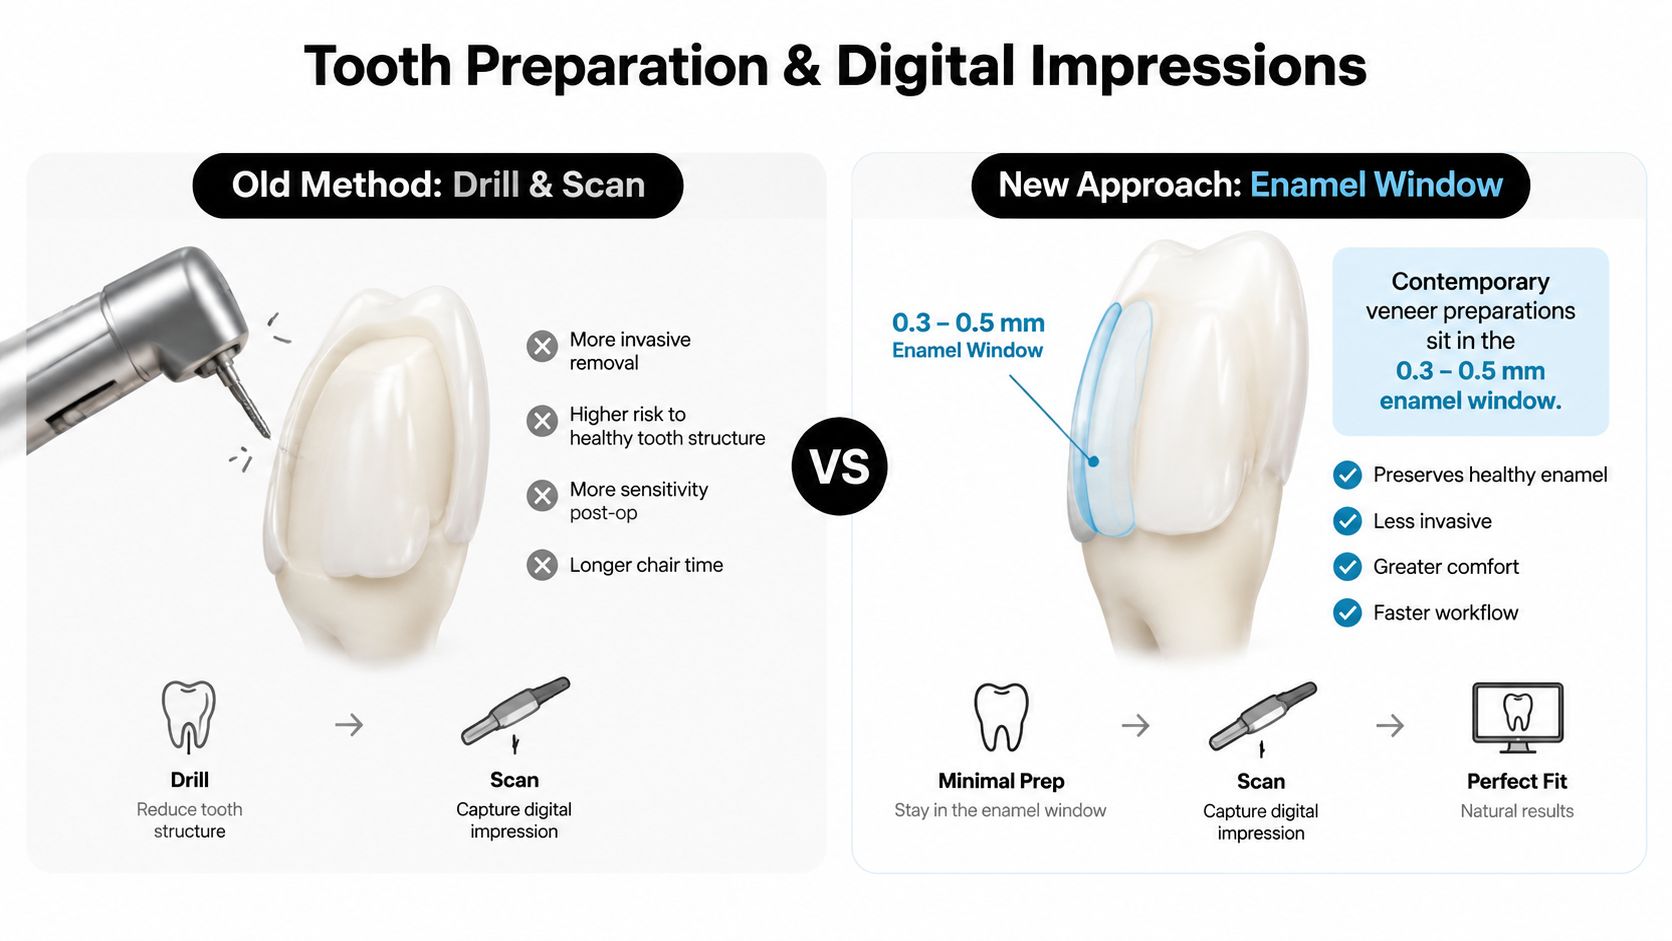
Local anaesthetic may be used even when the preparation is shallow, particularly if the teeth are sensitive or the dentist needs precise margin control. Margins are commonly positioned above or near the gumline when the case allows. Retraction helps expose the edges for scanning or impression-making, while moisture control protects the accuracy of the record.
Scan, preview, and approve
An intraoral scanner creates a digital model without the material bulk of a conventional polyvinyl impression. Many patients find scanning more comfortable, and the dentist can inspect the digital model immediately for missing data, margin visibility, and bite registration. Conventional impressions remain useful in some circumstances, particularly when tissue movement or access makes scanning difficult.
The scanner doesn't decide the final smile. You still need to confirm the proposed length, contour, shade direction, and relationship between adjacent teeth. Once enamel has been removed, the case has moved into an irreversible phase, so a digital preview is valuable before the laboratory begins fabricating the ceramic. The choice between veneers and fuller-coverage treatment also deserves careful discussion, as outlined in porcelain veneers versus crowns.
The historical development of modern veneers helps explain this emphasis on bonding. Temporary veneers appeared in 1928, acid etching was introduced in 1959, and porcelain etching for stronger bonding was demonstrated in 1982 (history of porcelain veneers and their clinical development). Today's conservative workflow rests on those foundational advances.
Living in Your Temporary Veneers
Temporary veneers are a working prototype. They protect prepared teeth, but their more valuable role is giving you a chance to live with the proposed design before the laboratory turns it into final ceramic.
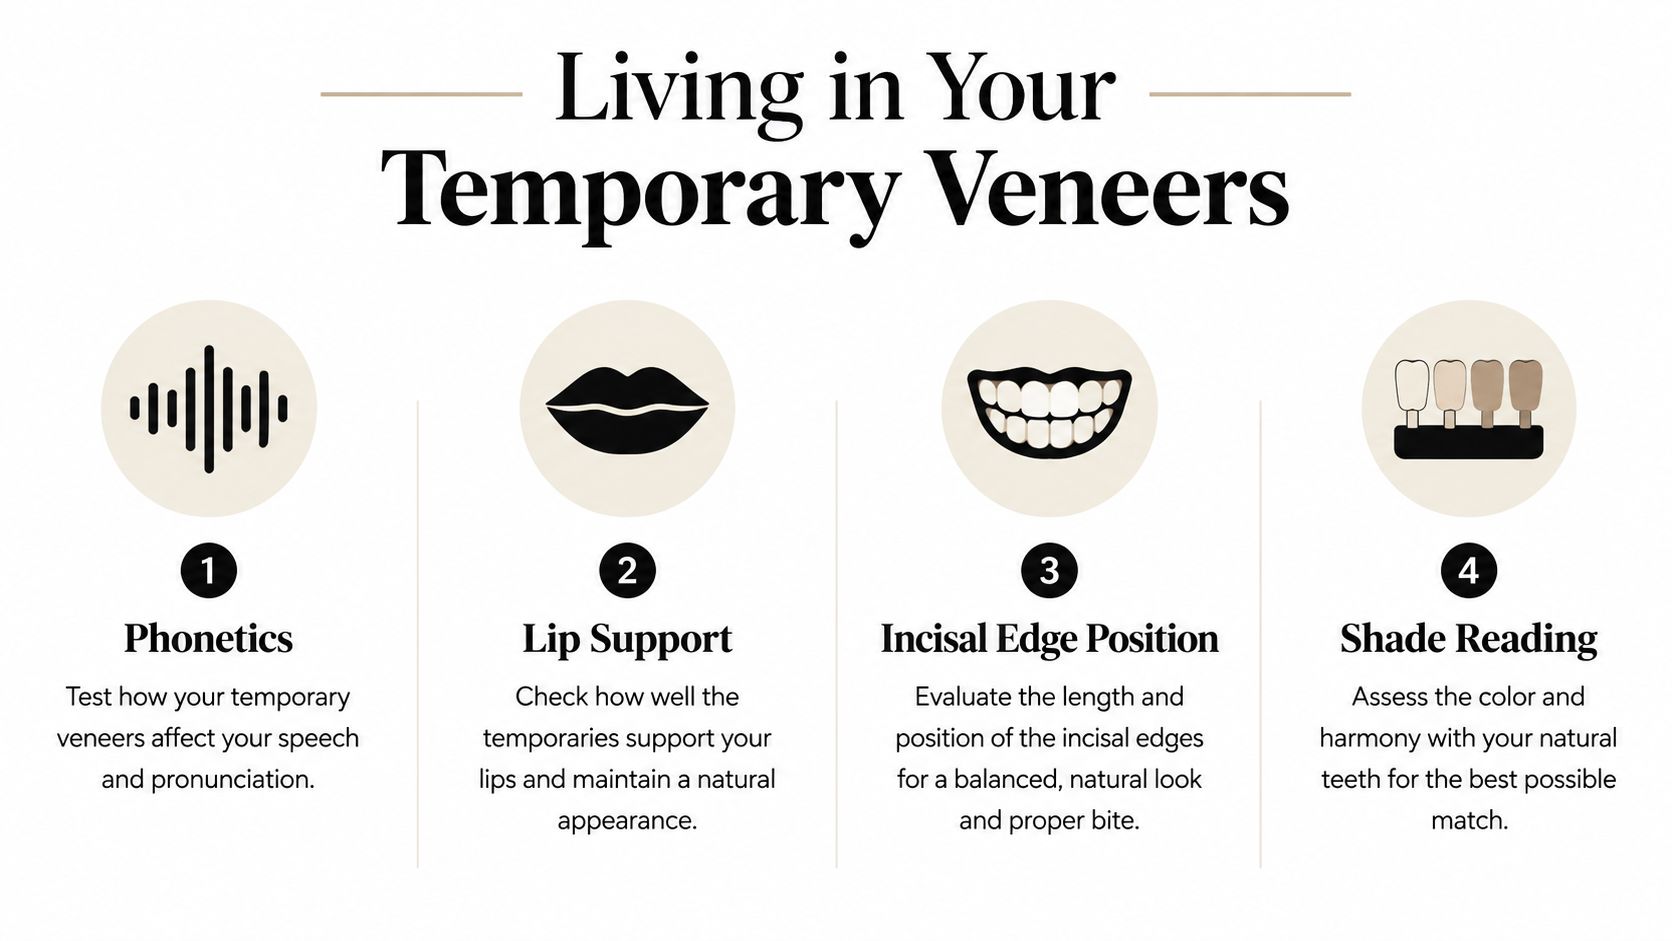
Speech is often the first test. Read aloud, make phone calls, and notice whether certain sounds feel different. Smile naturally, not only for a posed photograph. Pay attention to whether the lip feels supported, whether the incisal edges show too much or too little, and whether one tooth appears longer when your face is relaxed.
Test the provisional smile in ordinary life
Eat carefully and make observations rather than trying to “tough it out.” A bite that feels high, floss that catches, an open contact, or a rough edge deserves attention. You might notice that a lateral incisor looks short, a canine catches the lower lip, or the shade looks opaque under fluorescent lights.
Write those observations down. The lab may not see the temporaries in your mouth, so your notes and photographs become the communication bridge between the provisional design and the final restorations. Photos taken at the practice can be useful, but candid images at home often reveal how the smile reads in daylight and in ordinary expressions.
A temporary that feels slightly wrong is useful information, not a minor inconvenience to ignore.
Shade judgments can change dramatically with lighting. Look near a window, under indoor lighting, and in photographs taken from a normal conversational distance. You don't need to become a dental technician, but you do need to say exactly what concerns you. “Too white” is less actionable than “the central teeth look opaque beside the natural canines.”
Patients sometimes worry that requesting changes will delay treatment or appear difficult. In practice, early feedback is far easier to use than dissatisfaction after final bonding. A temporary phase that earns your approval gives the dentist and laboratory a better target for shape, surface texture, edge position, and shade character.
The Final Bonding Appointment
The final appointment is not just the moment the veneers are glued on. It is the point at which preparation quality, laboratory execution, fit, shade, isolation, and cementation have to work together.
The dentist first removes the temporaries and cleans the prepared surfaces. Residual provisional cement can interfere with bonding, so the enamel must be free of debris and the margins must be visible. Each veneer is then tried in, usually with a try-in paste that helps the team evaluate shade, contour, contacts, and how the ceramic relates to the surrounding teeth.
You should see the veneers in the intended arrangement before final cementation. Check your smile at rest and in motion, and ask for photographs if the practice uses them for comparison. A veneer that looks excellent on a laboratory model may read differently against your own tooth structure, lips, skin tone, and adjacent teeth.
Isolation is a clinical requirement
Once the design is approved, moisture control becomes essential. The dentist may use a rubber dam or a carefully planned system of cotton rolls, suction, cheek retractors, and gingival retraction. Saliva and blood can contaminate enamel or the bonding surface, reducing the reliability of the adhesive interface.
The dentist conditions the enamel and ceramic according to the selected materials and bonding system. The resin cement is chosen with attention to the veneer's thickness, translucency, and the shade of the underlying tooth. Thin anterior restorations may use a light-cure cement, while thicker or less translucent restorations may call for a dual-cure material, depending on the clinical circumstances.
Each veneer is seated with controlled pressure, excess cement is removed, and the restoration is polymerized. The dentist then checks contacts with floss, verifies the bite in normal closure and movement, smooths margins, and evaluates the gum response. Small adjustments at this stage can prevent an uncomfortable contact or premature bite interference from becoming a persistent problem.
The appointment should end with clear instructions about eating, sensitivity, cleaning, and the timing of the review visit. A final bond is a significant milestone, but it isn't the end of clinical oversight.
Aftercare Habits That Decide How Long Veneers Last
Porcelain is stain-resistant and strong, but it isn't indestructible. Long-term evidence shows both high survival and meaningful complications. In one prospective trial, 93% of restorations were recalled at 10 years, none of the veneers had been lost, yet only 64% remained clinically acceptable at 10 years, compared with 92% at 5 years; large marginal defects accounted for 20% and porcelain fractures for 11% of the reported problems (10-year clinical trial of porcelain veneers).
A broader meta-analysis reported complication rates of approximately 4% for fracture or chipping, 2% for severe marginal discoloration, 2% for debonding, 1% for secondary caries, and 2% for endodontic problems (clinical complications and risk factors for porcelain veneers). These figures don't predict exactly what will happen to one patient, but they do challenge the idea that veneers are set-and-forget treatment.
Protect the interface and the bite
A custom night guard deserves serious discussion if you clench or grind. Bruxism, smoking, and nonvital teeth have been associated with poorer outcomes, so a dentist should assess occlusal risk rather than handing every patient identical care instructions.
Daily maintenance is straightforward, but consistency matters:
- Clean the margins: Brush with a non-abrasive fluoride toothpaste and clean between teeth so plaque doesn't accumulate around the cement interface.
- Use veneers normally, not as tools: Don't bite packaging, tear tape, chew ice, or use the front teeth to open containers.
- Protect against grinding: Wear the prescribed night guard if clenching or bruxism is part of your history.
- Attend reviews: Professional examinations help identify marginal changes, mobility, bite interference, or small chips before they become larger failures.
- Discuss contributing habits: Smoking, acidic exposure, and reflux can affect the surrounding oral environment and opposing teeth.
The veneers themselves can't decay, but the natural tooth beneath and around them remains vulnerable. Fluoride, interdental cleaning, professional hygiene, and appropriate radiographs protect the structure that supports the restoration. Guidance on protecting restorations and maintaining oral hygiene also applies to broader tooth crown aftercare.
A review schedule should be individualized, but delaying care when something changes is rarely helpful. If floss suddenly catches, a veneer feels mobile, the bite changes, or the gum bleeds around one tooth, contact the dentist rather than waiting for the next routine visit.
Choosing Your Dentist and Making the Decision
Before you compare fees, compare workflows. A polished gallery can show the final image but not the preparation depth, the quality of the temporaries, the laboratory communication, or the bonding protocol that produced it.
Ask the dentist to explain:
- Case selection: Why are veneers appropriate, and what alternatives were considered?
- Enamel preservation: Where will the preparation sit, and what could require deeper reduction?
- Design approval: Will you review a wax-up or digital mock-up before preparation?
- Laboratory process: Who fabricates the ceramic, and how will your provisional feedback reach the lab?
- Bonding protocol: How will the team isolate the teeth and verify fit before cementation?
- Maintenance: What happens if a veneer chips, debonds, or develops a marginal concern?
Comparing veneer provider types
| Factor | General Dentist | Cosmetic-Focused Practice | Multi-Specialty Clinic |
|---|---|---|---|
| Typical emphasis | Broad preventive and restorative care | Smile design, aesthetics, photography, and ceramic planning | Coordinated cosmetic, periodontal, orthodontic, and restorative treatment |
| Useful strength | Familiarity with your overall dental history and routine needs | Concentrated experience with appearance, proportion, and laboratory communication | Ability to manage cases involving several dental disciplines |
| Questions to ask | How often does the dentist place veneers? | How is enamel preservation documented? | Who coordinates the treatment plan and follow-up? |
| Potential limitation | Cosmetic case volume may vary | Complex structural or gum issues may require additional providers | More than one clinician may be involved, so continuity should be clarified |
A practice that promises same-day veneers without meaningful planning, pressures you to decide immediately, or refuses to show the proposed preparation and design deserves caution. Price alone won't tell you whether the treatment is conservative or whether the dentist has a reliable plan for complications.
For patients comparing fees and treatment scope, a detailed guide to porcelain veneers cost per tooth can help frame the financial conversation without reducing the decision to a single number.
The right decision checklist is practical: desired shade, acceptable tooth length, preparation limits, laboratory choice, provisional testing, isolation and bonding protocol, bite protection, and follow-up access. If the dentist answers those questions clearly, you can weigh the treatment on clinical value rather than marketing language.
Paul L. Gregory, DDS provides cosmetic and restorative dentistry, including porcelain veneers, smile planning, digital scanning, and custom night guards, within a broader dental practice in Midtown Manhattan. To discuss whether veneers fit your goals and oral health, visit Paul L. Gregory, DDS and schedule a consultation.