

You're sitting in the chair, listening to a diagnosis that sounds bigger than the tooth in front of you. The pain may have started as a sharp zing with cold water, or it may have turned into a dull ache that won't quit. Then the words land, root canal and crown, and the questions start all at once. Why this tooth, why now, and why does it need two procedures instead of one?
The short answer is that your dentist is trying to save the tooth, not calm it down. A root canal treats the infected or dying tissue inside the tooth, and a crown protects what's left after that treatment. Those two parts work together, because a tooth that has been cleaned from the inside still needs strong coverage on the outside.
This matters more often than people think. A major global review found that 8.2% of teeth worldwide have been root-filled, and 55.7% of adults over 18 have at least one root-filled tooth (global epidemiology review). In other words, this is a common part of dental care, not a rare rescue procedure.
Why Your Dentist Recommended a Root Canal and Crown
A patient often hears the recommendation after a filling breaks, a deep cavity reaches the nerve, or an old tooth starts throbbing at night. At that moment, the mind jumps to the worst-case scenario. In reality, the goal is usually simple, to remove the source of infection and keep the natural tooth in place.
What the diagnosis usually means
Inside every tooth is soft tissue called the pulp. When bacteria reach that space, the pulp can become inflamed, infected, or die, and the tooth may begin to hurt, swell, or feel tender to chewing. A root canal removes that damaged tissue, cleans the canal system, and seals the tooth so the infection doesn't keep spreading.
A crown is the next step because a treated tooth has lost its internal blood supply and much of its original strength. If the tooth is left with only a filling, chewing forces can concentrate on weakened walls. A crown wraps those walls in a protective shell, which is why many dentists treat the two steps as one restoration plan rather than separate choices.
Practical rule: if the tooth was fragile before the root canal, it's usually still fragile after the infection is removed.
If you're in pain and waiting for care, a same-day assessment can matter. An emergency dentist can determine whether the problem is coming from the nerve, the crown, the gum tissue, or a cracked restoration.
What Happens During Root Canal Treatment
A patient often expects a long, painful ordeal, but the procedure is more controlled than that. The tooth is numbed first and isolated from the rest of the mouth, so the dentist can work in a clean field. What looks like one canal on the outside is usually a small branching tunnel system inside, and that hidden anatomy is what often determines how well treatment succeeds.
The procedure in plain language
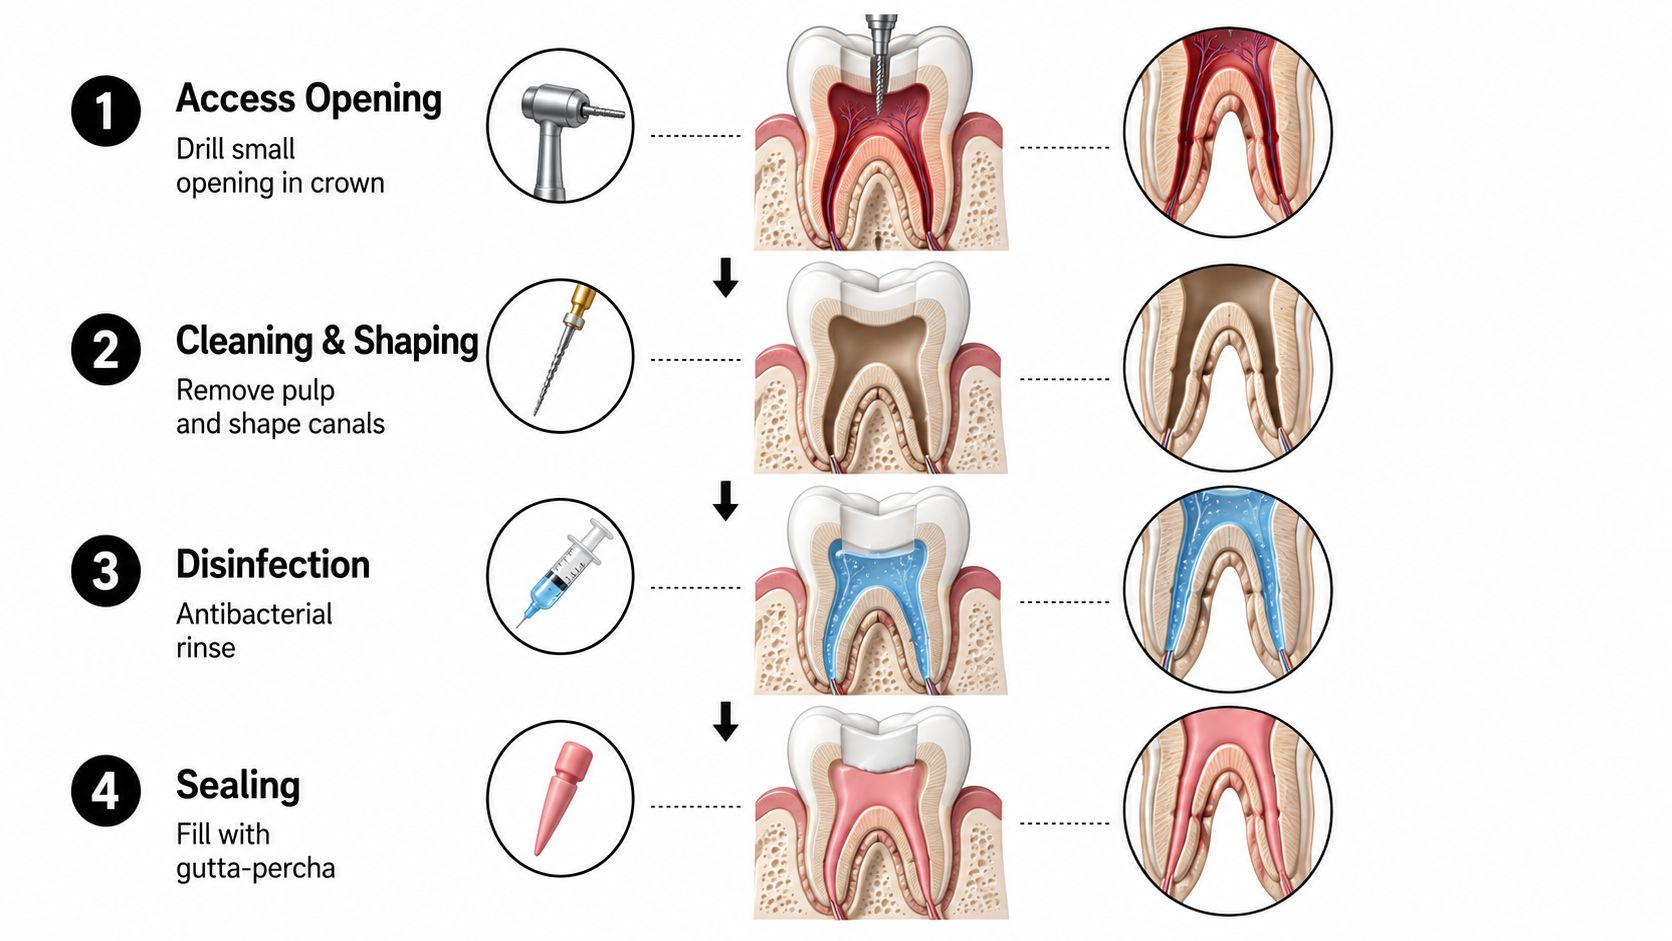
The first step is access. The dentist makes a small opening through the crown of the tooth, just large enough to reach the canals. After that, tiny files remove the infected pulp and shape the canal walls so they can be cleaned properly. Curved canals, narrow branches, and extra hidden pathways can make that part more demanding, because missing even a small area can leave bacteria behind.
The next step is disinfection. The AAE states that NaOCl, or sodium hypochlorite, is the preferred irrigant, that irrigation should occur at each instrument change, and that rubber dam isolation is mandatory to keep the tooth free of contamination (AAE treatment standards). That chemical cleaning matters because mechanical filing alone cannot reach every surface inside a complex canal system. A second AAE document gives the same treatment principles and supports careful irrigation and isolation as part of predictable endodontic care (AAE treatment standards).
The final step is sealing. The cleaned canal space is filled so bacteria cannot re-enter. Working length matters here, because the AAE reports the best healing results when instrumentation stops 0.5 to 1.0 mm short of the radiographic or anatomic apex, with an electronic apex locator plus verifying radiographs used to set that length.
A dental crowns visit usually follows after the root canal is completed, because the tooth still needs structural support after the internal infection is removed. The procedure is designed to stop infection, preserve the tooth, and prepare it for long-term chewing forces, especially when the original anatomy was difficult to clean.
Why a Crown Is Essential After a Root Canal
A root canal saves the tooth from the inside. A crown protects what is left on the outside. That difference decides whether the tooth can keep handling chewing forces, because a treated tooth no longer has the pulp chamber and internal moisture that once helped support it.
Strength changes after treatment
A living branch bends before it breaks. A dried branch snaps sooner under the same load. A tooth after root canal treatment can behave in a similar way, especially when decay or a large filling has already removed a lot of the original structure.
A temporary filling only buys time. It seals the tooth for the short term, but it does not spread biting force across the tooth the way a crown does. A crown covers the tooth like a fitted helmet, which helps lower the risk that a cusp will split or that the tooth will fracture vertically, a problem that often leaves extraction as the only practical option.
For patients comparing materials, the choice usually comes down to porcelain-fused-to-metal, all-ceramic, or zirconia. The material matters, but the main issue is support. The crown surrounds a weakened tooth so it can keep doing its job under daily use.
A dedicated dental crowns visit can also be used to discuss timing, bite forces, and how the final restoration should fit the tooth's location and function. The crown is not a cosmetic extra. It is the part that helps the root canal hold up over time.
If the tooth needs a root canal, the crown is part of the repair.
How Tooth Anatomy Changes the Difficulty of Your Root Canal
One reason patients get different recommendations for what sounds like the same procedure is anatomy. Some teeth have one fairly direct canal. Others have multiple canals, sharp curves, hidden branches, and narrow spaces that are easy to miss if the view is limited.
Curves, branches, and hidden spaces
A major review of anatomical complexity notes that canals over 30° of Schneider curvature are considered high-difficulty cases and often need magnification, precurved hand files, careful coronal preflaring, and advanced irrigation strategies (tooth anatomy review). That's not because the dentist is being dramatic. It's because curved canals are more likely to resist cleaning and more likely to create procedural problems.
The issue is bigger than curvature alone. The root canal system can include accessory canals, lateral canals, furcation canals, and apical deltas, many of which don't show clearly on a routine two-dimensional X-ray. That hidden anatomy helps explain why a tooth can look acceptable on paper but still harbor bacteria in places the file never reached.
If your dentist recommends CBCT imaging or refers you to a specialist, that usually means the tooth needs more precise visualization, not that treatment has already failed. A dental x-rays discussion can help clarify why angled images or three-dimensional views sometimes change the treatment plan.
A straight incisor and a multi-rooted molar are not equal cases. They may both need root canal therapy, but they don't demand the same level of access, cleaning, or time.
Modern Disinfection Protocols That Improve Long-Term Success
A root canal succeeds or fails in spaces the eye cannot see. The file shapes the main passage, but bacteria often survive in fins, fins-like extensions, and tiny irregular areas along the canal wall. That is why disinfection has to do more than remove visible tissue.
Chemical cleaning matters
Chemical irrigation reaches areas instruments cannot fully contact, especially in curved canals and side branches. The goal is to wash out debris, break down remaining organic material, and reduce the bacterial load before the tooth is sealed. The American Association of Endodontists identifies sodium hypochlorite, or NaOCl, as the preferred irrigant for canal disinfection and recommends irrigation at each instrument change. AAE treatment standards
A stronger cleaning sequence usually combines NaOCl with other steps. 17% EDTA is commonly used as a final rinse for a short period to remove the inorganic smear layer left after shaping. That smear layer can block sealer contact with the dentin wall, so clearing it helps the final fill adapt more closely to the canal. In practical terms, a smoother wall gives the sealer a better chance to lock the space shut.
Some clinicians also use chlorhexidine in selected situations, especially when they want an antimicrobial rinse without relying on sodium hypochlorite alone. It can be useful as part of a broader protocol, but it does not replace the tissue-dissolving action that NaOCl provides. The choice of irrigant depends on the tooth, the canal anatomy, and the stage of treatment.
Isolation matters just as much as the rinse itself. A rubber dam keeps saliva and oral bacteria out of the tooth while the canal is being cleaned and filled. Without that barrier, contamination can undo careful work inside the root system.
The sequence matters because endodontic treatment works in layers. Shaping creates access, irrigation cleans the parts instruments cannot reach, and the final seal closes the space so bacteria have fewer places to return. If one layer is weak, especially in a tooth with missed anatomy or tight curves, the outcome becomes less predictable.
Bottom line: root canal success depends on careful shaping, targeted irrigation, and a clean final seal. The crown matters too, because a sound restoration helps protect the disinfected canal from later leakage and fracture.
When a Root Canal Fails and Retreatment Becomes Necessary
A completed root canal can still develop problems later. That doesn't mean the original decision was wrong. It usually means something was missed, changed, or reintroduced after treatment.
Retreatment versus extraction
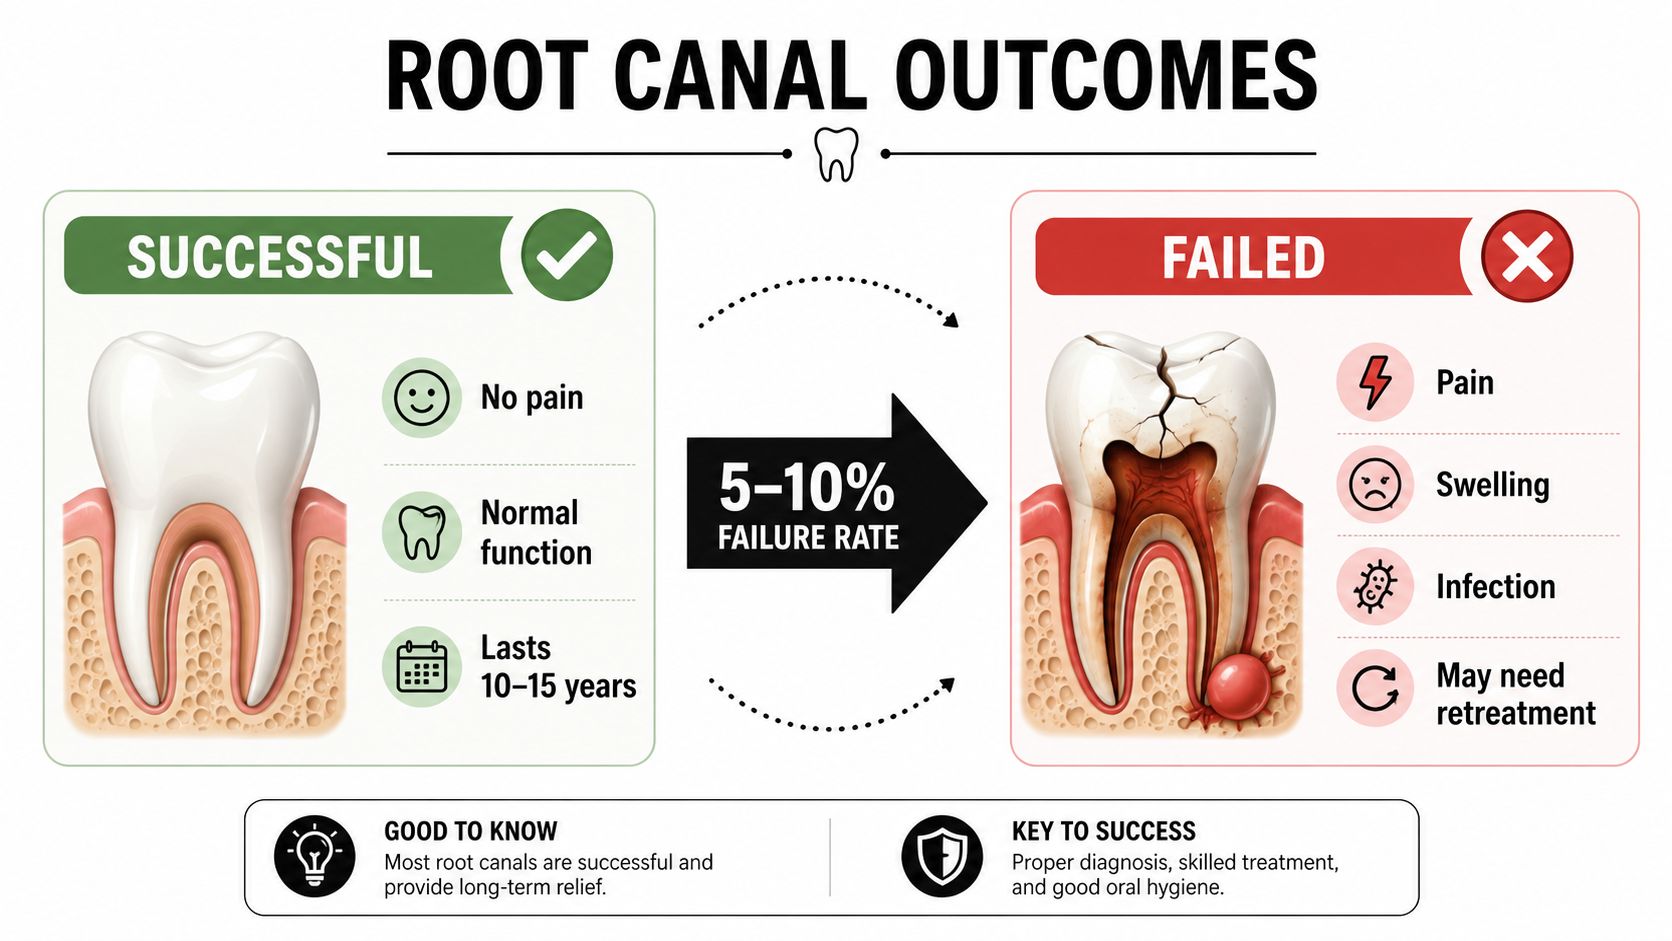
The most common reasons for failure are missed canals, incomplete debridement, or new leakage from a crown or filling. A review of retreatment decision-making emphasizes that modern imaging, including CBCT and angled radiographs, improves the ability to detect anatomy that standard views can miss (retreatment review).
That's where the decision gets practical. If the tooth is restorable, the symptoms point to lingering infection, and the original canal fill can be revised, retreatment is often the first option. If the tooth is cracked beyond repair, has lost too much structure, or can't be sealed predictably, extraction may be the safer route. A dentist may also compare that option with an dental implants discussion if replacement will eventually be needed.
Long-term outcome data support trying to preserve the tooth when the anatomy allows it. A 10-year retrospective cohort reported about 93% tooth survival at 10 years, meaning around 7% were extracted over that period, while a systematic review found pooled success rates of 92.6% under loose criteria and 82.0% under strict criteria (10-year cohort and systematic review). That's why persistent pain needs evaluation, not panic.
A treatment that hurts for a few days doesn't automatically mean failure. Ongoing swelling, biting pain, or recurrent infection deserves a recheck, but the next step should be diagnosis, not guesswork.
Your Recovery Timeline and Long-Term Care Plan
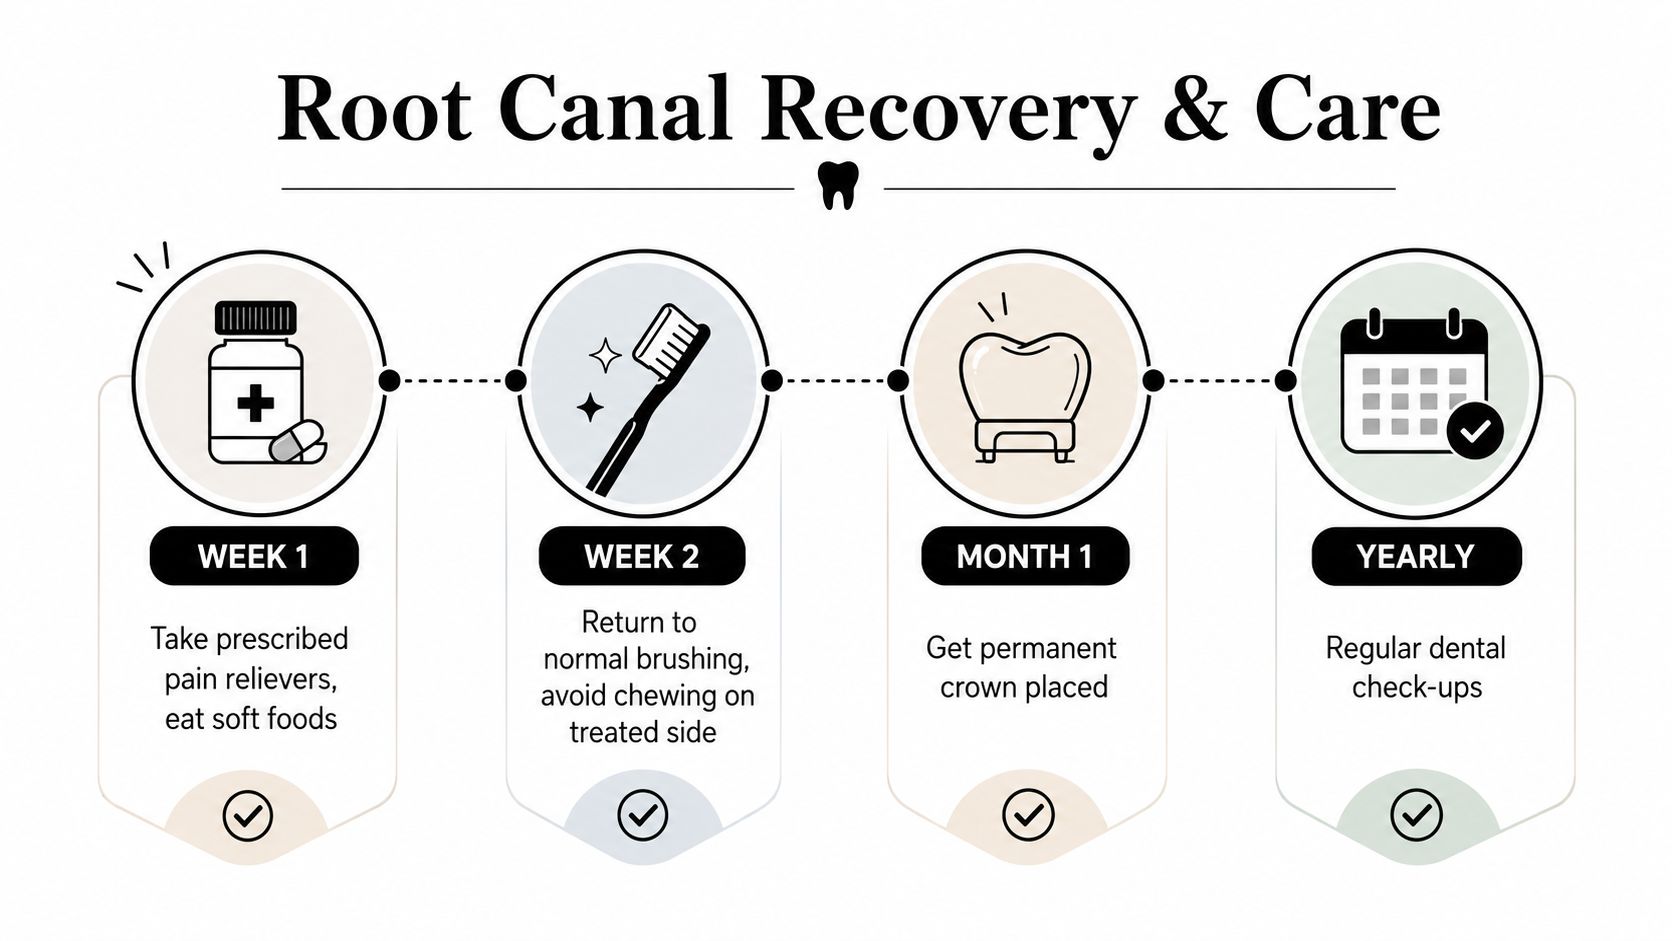
The first day after treatment often brings mild soreness, not the original infection pain. That soreness usually settles with standard pain relief and a softer diet, especially once the numbness wears off. If the tooth feels different when you bite, that's a reason to call sooner rather than later.
What to watch for over time
Use the first week to protect the tooth, then the next phase to restore it fully with the crown. After that, routine cleanings and X-rays help confirm that the area around the root stays quiet. Long-term success depends on keeping the restoration sealed and the gums healthy.
A few habits matter more than people expect:
- Chew carefully at first: Give the tooth time if it has only a temporary filling.
- Keep the crown clean: Brush and floss at the gumline so plaque doesn't collect around the margins.
- Avoid hard shortcuts: Don't use the tooth to crack ice, open packaging, or bite hard objects.
- Address grinding early: If you clench or grind, a night guard can reduce stress on the restoration.
- Report new symptoms quickly: Sensitivity, swelling, or a loose crown deserves attention, not waiting.
A periodontal evaluation can also matter if the surrounding gums are inflamed or if deep cleaning is needed around the treated tooth. Periodontal therapy helps protect the foundation the crown sits on.
The goal after a root canal isn't just pain relief. It's keeping the tooth functional, sealed, and usable for years.
If you're trying to decide whether a root canal, a crown, or both make sense for your tooth, Paul L. Gregory, DDS offers diagnostics, endodontic treatment, crowns, and follow-up care under one roof. Visit Paul L. Gregory, DDS to review your symptoms, understand your options, and get a clear plan for saving the tooth if it can be saved.