

You've just left the dental chair, still numb, holding gauze in your mouth and a printed instruction sheet you'll probably read properly once you're home. The immediate question is usually simple: how long will root canal recovery take, and when can you use the tooth normally again?
The answer has two parts. Pain and tenderness usually improve quickly, often over the first several days. The treated tooth, however, may remain structurally vulnerable until the permanent filling, crown, or onlay is placed. Symptom relief and functional recovery are related, but they aren't the same thing.
The First 24 Hours After Your Root Canal
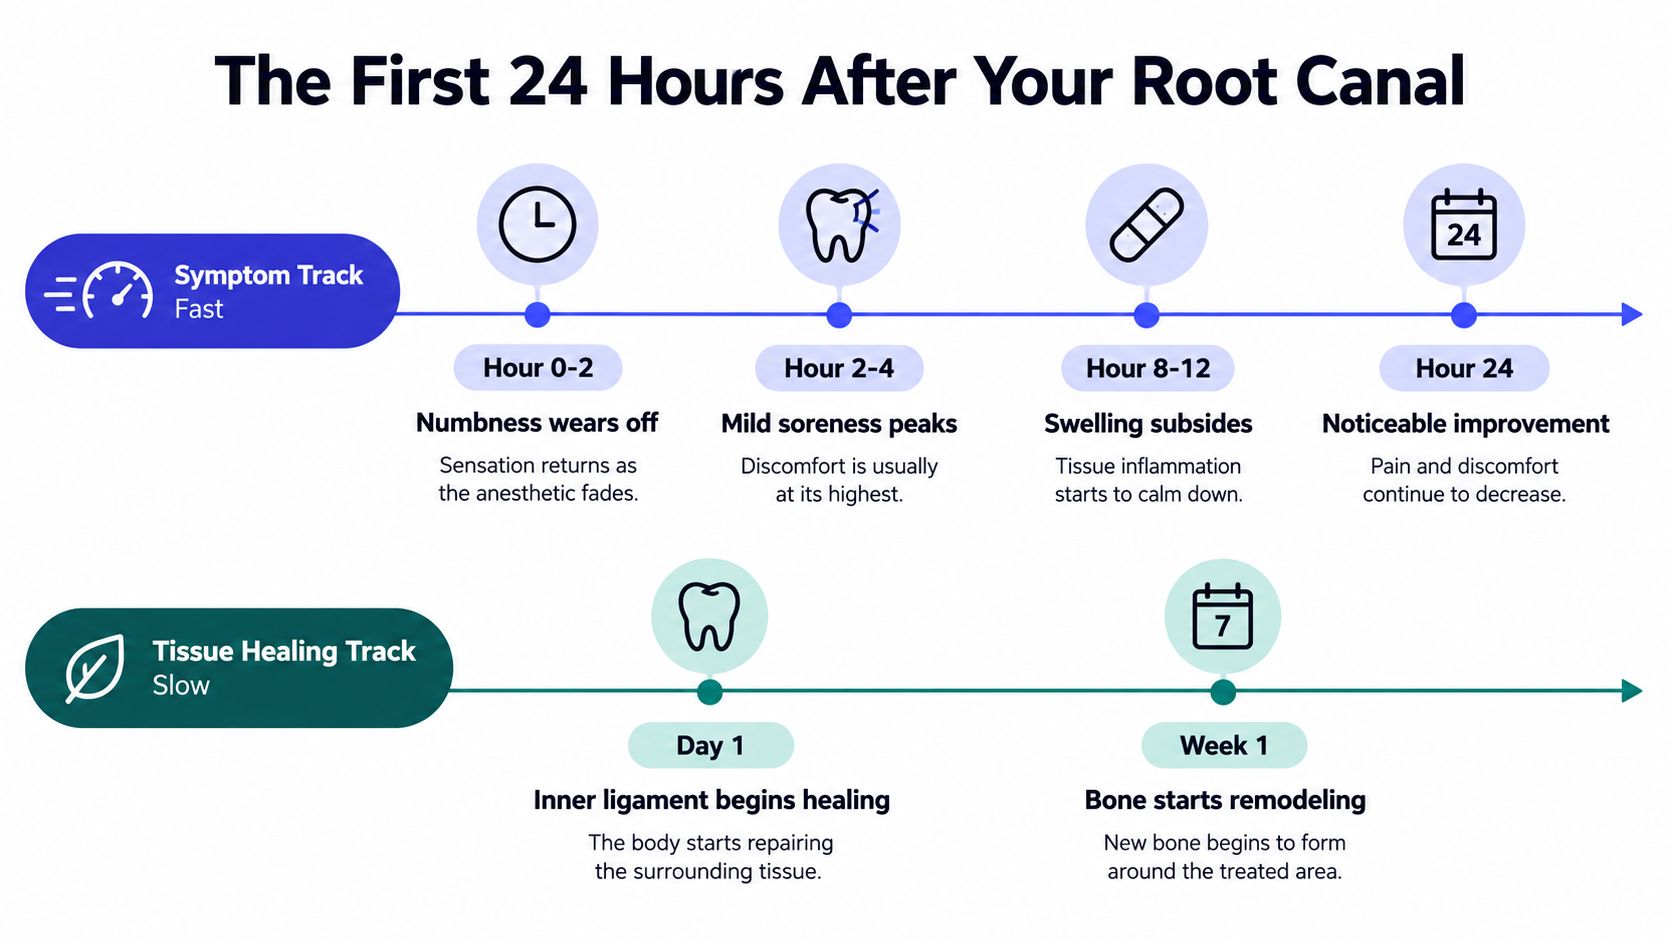
The first day is mostly about protecting the treatment site while the anesthetic fades. Keep firm pressure on the gauze for the period your dentist instructed. If bleeding has stopped, you generally don't need to keep replacing the gauze. Contact the dental office if bleeding continues or becomes difficult to control.
Don't eat until normal feeling has returned. Numb lips and cheeks make it easy to bite yourself or burn your mouth with food or drinks that feel harmless. Choose soft, lukewarm or cool food when sensation comes back, and chew away from the treated tooth.
A dull ache, pressure, or tenderness when biting is expected after treatment. The tissues around the root have been handled during the procedure, so the tooth can feel unfamiliar even when the root canal itself went smoothly. It may also feel slightly “high,” as though it touches first when you close your teeth. A mild awareness can settle, but a bite that feels clearly uneven deserves a call because a small adjustment may be needed.
Cleveland Clinic's root canal guidance explains that most patients recover in less than a week. A large pain-prevalence study cited in the clinical evidence found pain in 81% of patients before treatment, falling to 40% after 24 hours and 11% after one week, while average pain severity fell from 54 out of 100 before treatment to 5 out of 100 after one week. The practical message is clear: soreness is usually strongest early and should trend downward, not build.
What to do before the evening
- Follow the prescription instructions: Take prescribed medication exactly as directed, and check with your dentist or pharmacist before combining medicines.
- Prepare soft food: Have yogurt, applesauce, mashed potatoes, eggs, or a smoothie ready before hunger arrives.
- Protect the temporary restoration: Don't chew hard, sticky, or crunchy food on the treated side.
- Arrange help when needed: If sedation was used, follow the office's transportation and activity instructions rather than driving yourself.
- Save the office number: You shouldn't have to search for it while dealing with unexpected pain or swelling.
For a useful explanation of the treatment appointment itself, see this guide to how long a root canal takes. The procedure may be finished, but the tooth still needs careful handling until its final restoration is in place.
Managing Pain and Swelling the Right Way
Post-treatment discomfort rarely requires a dramatic response. Start with the pain plan your dentist gave you, use an over-the-counter medicine only if it's appropriate for your health history, and judge progress by the direction of your symptoms.
For many healthy adults, an anti-inflammatory such as ibuprofen can help with the inflammation around the tooth. Acetaminophen may be a better choice for people who can't take nonsteroidal anti-inflammatory drugs because of certain medical conditions, allergies, medication interactions, or stomach concerns. Don't guess about combinations or dosing. Ask your dentist or pharmacist, especially if you take blood thinners, have kidney or liver disease, are pregnant, or have been prescribed other medication.
Opioids are rarely the first answer for routine root canal discomfort. They can cause drowsiness, nausea, constipation, and impaired driving, while an appropriate non-opioid plan is often sufficient. Use only medication that has been recommended for you.
Reduce the irritation
Cold therapy can calm early swelling and throbbing. Wrap an ice pack in cloth and apply it to the cheek in short intervals, allowing the skin to warm between applications. Never place ice directly against your skin, and stop if the area becomes painful or overly cold.
Keep your head slightly raised the first night. An extra pillow can reduce the sense of pressure that sometimes becomes more noticeable when you lie flat. Avoid strenuous exertion while the area is actively throbbing, and don't keep pressing the tooth with your tongue to check whether it still hurts.
Practical rule: Pain that responds to the recommended medication and feels lower each morning is usually following the expected course. Pain that doesn't respond, becomes sharp, or worsens after the early healing period needs professional review.
If your mouth is still numb when you arrive home, wait before eating and avoid hot drinks. Persistent numbness lasting longer than your dental team told you to expect also warrants a phone call. For broader advice about managing oral discomfort after dental procedures, Mouthology's guide to wisdom teeth recovery offers practical aftercare context, although your root canal instructions take priority.
You can also review the practice's explanation of root canal dental treatment and aftercare before changing your medication or activity routine.
Eating and Drinking Without Setting Yourself Back
Food should follow the recovery clock, but the restoration status matters more than the calendar. A tooth with a temporary filling or temporary crown may feel comfortable before it's ready for full chewing force.
On the first day, choose soft food at a comfortable temperature. Yogurt, applesauce, mashed potatoes, oatmeal, and smoothies are reasonable options once the anesthetic has worn off. Hold a smoothie or soft food on the opposite side without biting down on the treated tooth.
As tenderness settles, add scrambled eggs, soft pasta, soft fish, and other foods that don't require forceful chewing. You can gradually return to more familiar textures as comfort allows, but don't “test” the treated tooth with nuts, ice, hard candy, crusty bread, chips, or sticky sweets. That test tells you very little and can damage a tooth that still needs its final restoration.
| Day | Recommended Foods | Avoid |
|---|---|---|
| Day one | Yogurt, applesauce, mashed potatoes, oatmeal, cool or lukewarm smoothies | Very hot food or drinks while numb, hard foods, sticky foods, chewing on the treated side |
| Days two through three | Scrambled eggs, soft pasta, soft fish, tender cooked foods | Hard, crunchy, chewy, or temperature-extreme foods that provoke discomfort |
| Days four through seven | Gradually more normal textures, while keeping pressure off the treated tooth | Hard or sticky foods on the treated tooth until the permanent restoration is seated |
Chewing only on the untreated side for too long can overload that side of your jaw and create its own soreness. Use the treated tooth only as permitted by your dentist, but don't turn the opposite side into a workhorse.
Alcohol and smoking deserve caution during this period. They may irritate healing tissues and can interact with prescribed medication. Follow the specific instructions attached to your prescription, and ask the prescribing clinician if you aren't sure whether alcohol is safe.
The central rule is simple: eat normally only after the tooth is fully restored and your dentist confirms that normal loading is appropriate. Pain relief doesn't mean the tooth has regained its full strength.
Keeping the Treated Tooth Clean
A temporary filling isn't a reason to stop brushing. Plaque around the gumline can irritate the area and compromise the clean environment your dentist is trying to maintain. Clean the tooth carefully, not aggressively.
Use a soft-bristled toothbrush and gentle circular movements. Brush the chewing surface and gumline without scrubbing directly against the edge of the temporary material. If the area feels tender, reduce pressure rather than skipping hygiene altogether.
Flossing needs one important adjustment. Slide the floss gently between the teeth, clean the sides, then pull the floss out through the side instead of snapping it upward against the temporary filling. That motion reduces the chance of lifting or dislodging the material.
Protect the temporary seal
The access opening used during treatment and the tooth's previous decay can leave the tooth more vulnerable to fracture. A crown or onlay, when prescribed, restores resistance to chewing forces. Cleaning keeps the seal and surrounding gums healthy, but it doesn't replace the protection of a permanent restoration.
- Use a soft brush: Choose soft bristles and light pressure around the treated tooth.
- Floss deliberately: Pull floss out sideways rather than forcing it back up.
- Rinse gently: An alcohol-free rinse can freshen the mouth without the sting some people experience from alcohol-containing products.
- Avoid biting experiments: Don't crack shells, tear packages, chew ice, or test the bite with hard food.
- Be cautious with powered irrigation: Skip a Waterpik directly around the site if your dentist has advised against it or if the temporary filling feels loose.
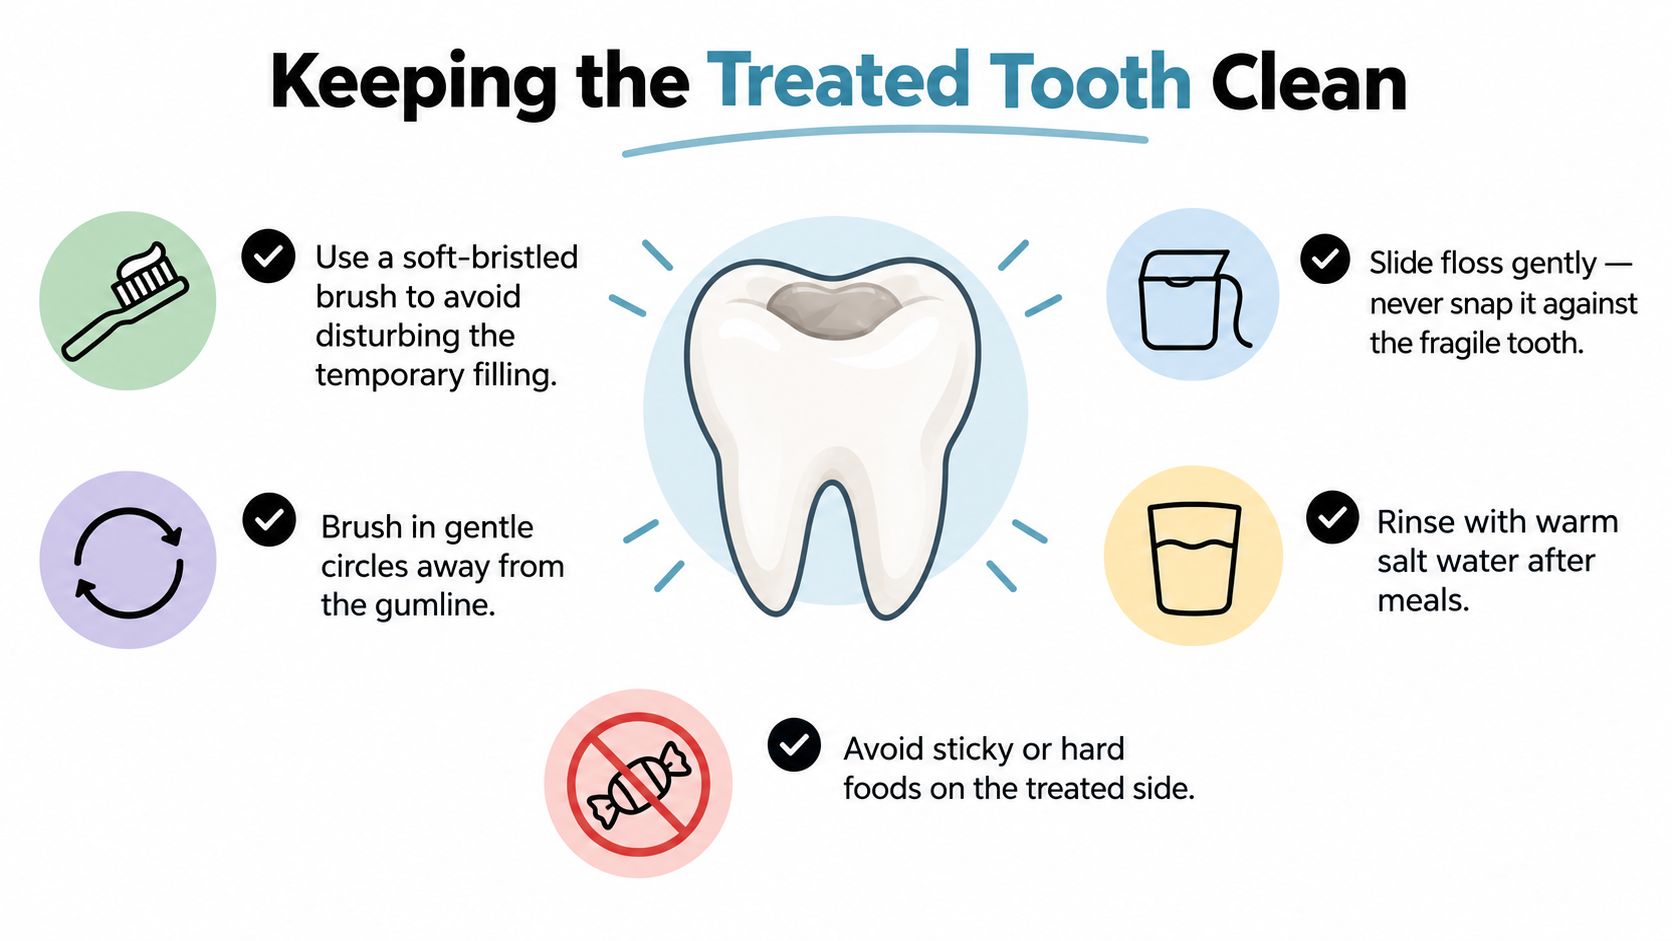
Normal brushing and flossing are part of protecting the restoration, not merely a way to freshen your breath. If you want to understand what happens during a professional cleaning while the tooth is healing, review the dental cleaning process.
Getting Back to Work, Workouts, and Travel
Many individuals don't need to put their entire schedule on hold after a root canal. Desk work can often resume when you feel alert and the numbness has resolved, provided you can manage the remaining tenderness. If sedation was used, follow the discharge instructions instead of making your own return-to-work decision.
Light walking is a sensible first activity. Hold off on heavy lifting, intense intervals, inversions, and other exertion that makes your pulse pound while swelling or throbbing is active. Increased pressure can make the area feel worse and may aggravate bleeding in the early period.
Use function, not optimism, as your guide
A pain-free tooth at rest isn't automatically ready for full chewing or full-body exertion. Ask two separate questions:
- Can I function comfortably? Can you speak, concentrate, sleep, and move without symptoms escalating?
- Can the tooth handle the load? Has the permanent filling, crown, or onlay been placed, and has your dentist cleared normal chewing?
The first question concerns symptom recovery. The second concerns structural protection. Those timelines can differ, which is why feeling better quickly shouldn't encourage hard chewing on a temporarily restored tooth.
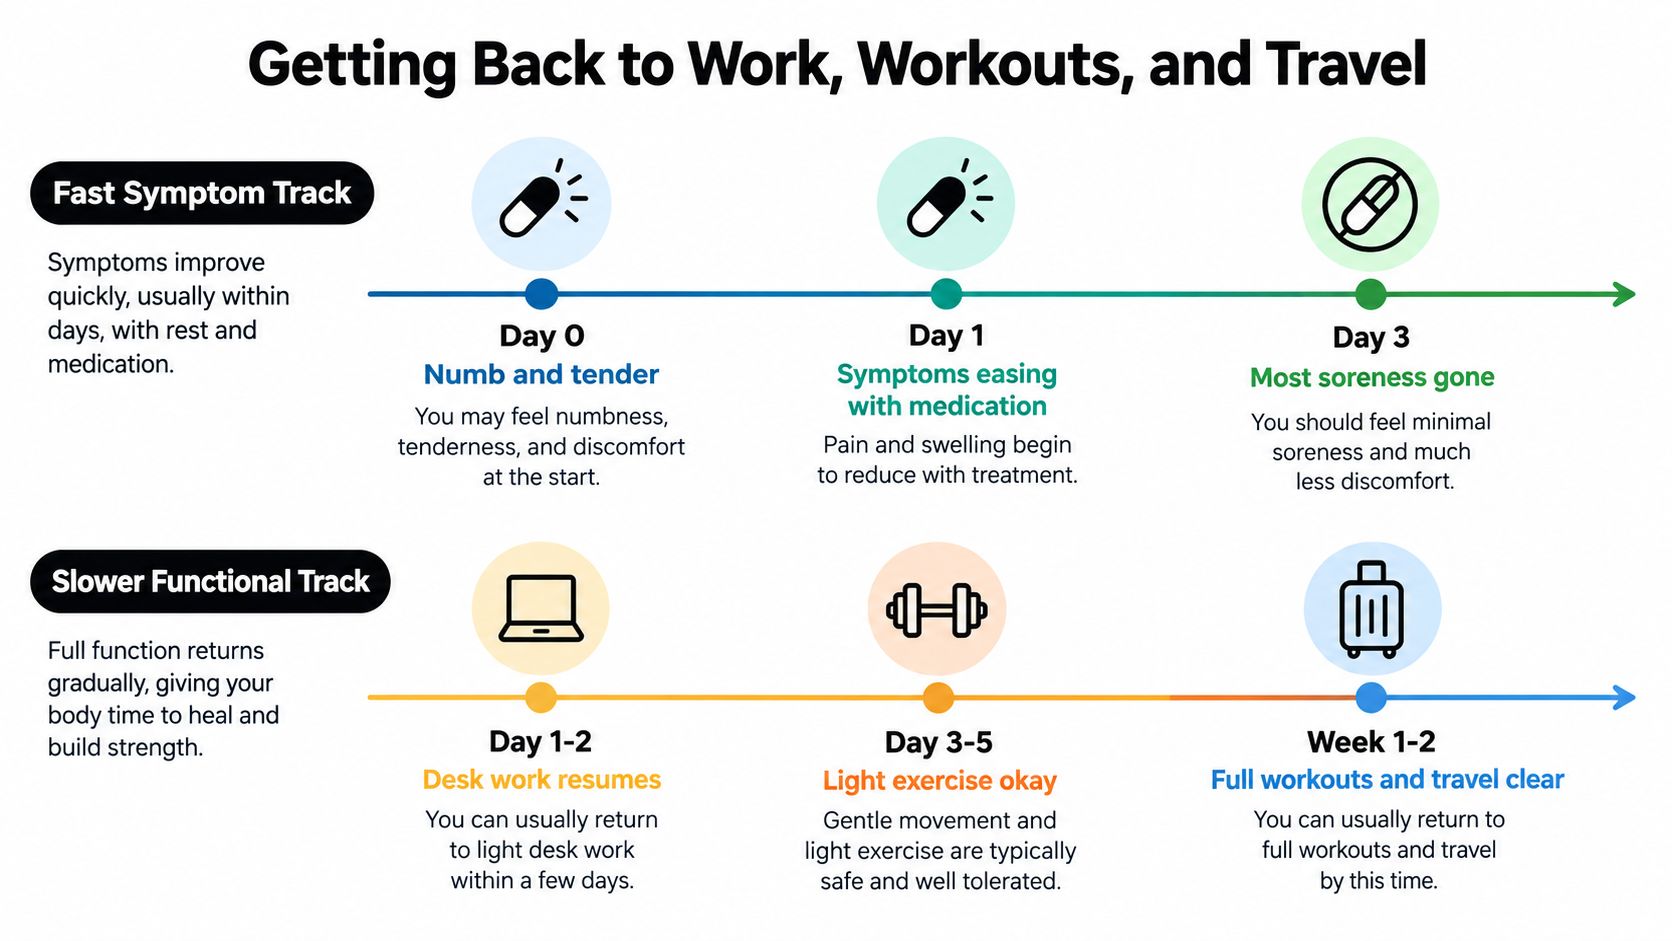
Travel is usually a planning issue rather than an automatic restriction. Don't leave town without knowing how you'll reach a dentist if swelling or escalating pain develops, and keep prescribed medication in its original container. Flying may be reasonable once symptoms are controlled, but scuba diving and other activities involving unusual pressure should wait until your dental team confirms that the tooth and restoration are ready.
Sleep with your head slightly raised while throbbing is noticeable. For advice suited to work demands, read when you can go back to work after a root canal.
Follow-Up Visits and the Road to a Permanent Crown
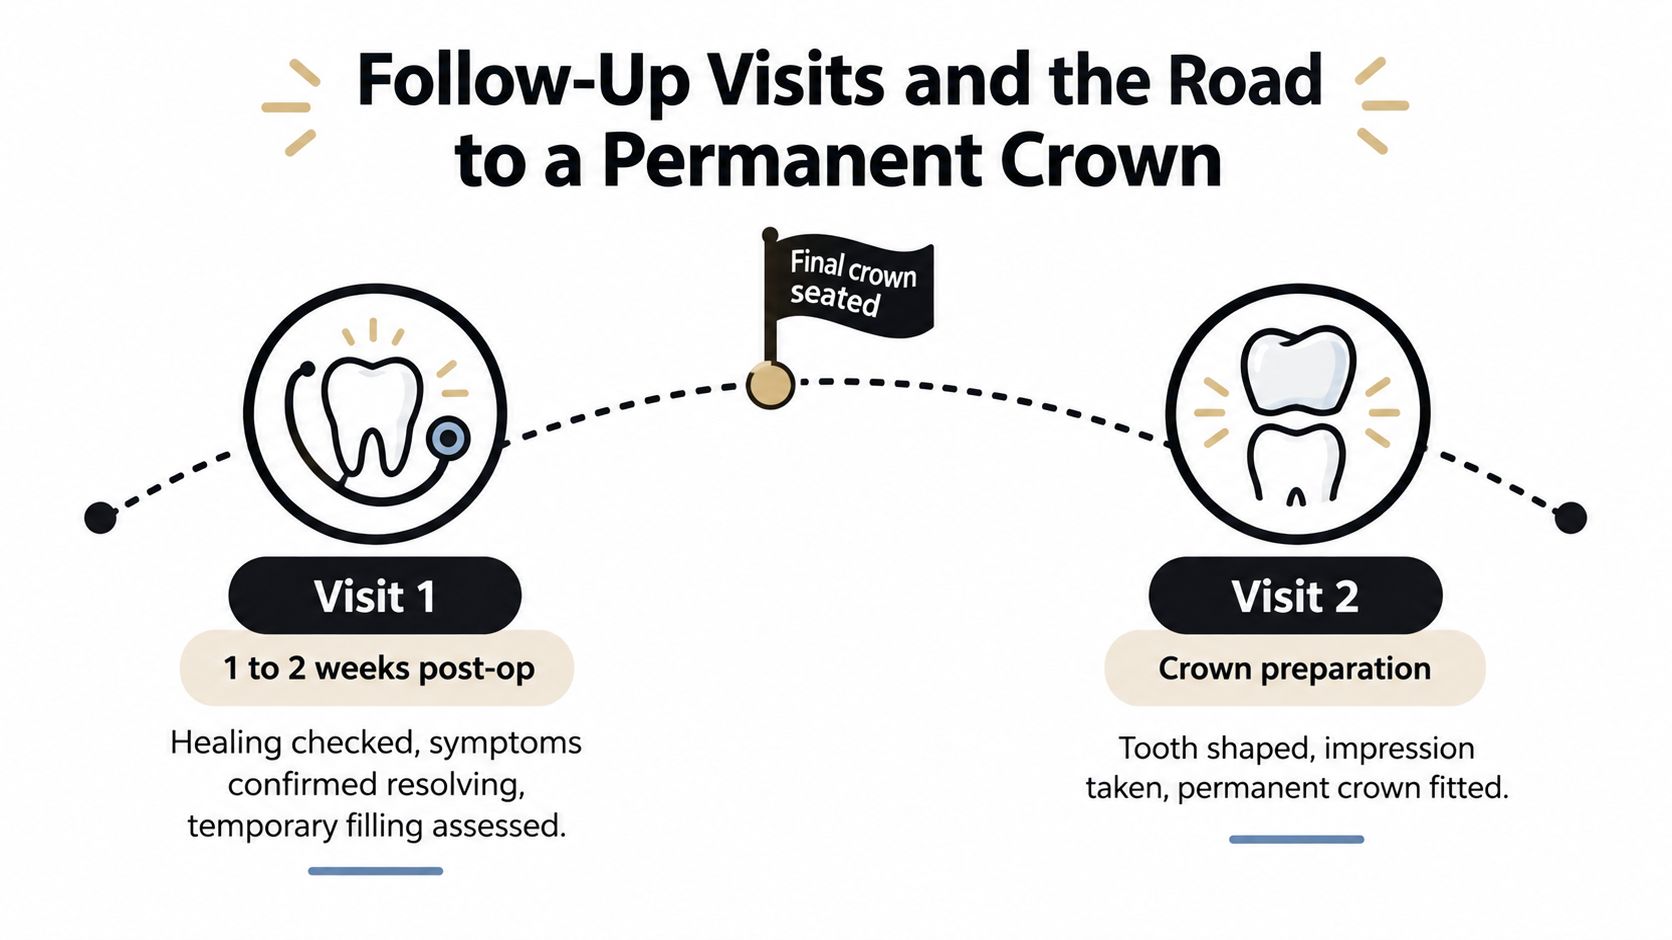
The root canal removes infected or inflamed tissue and seals the internal space. It doesn't automatically make the tooth indestructible. The next appointment matters because your dentist needs to evaluate the tooth's symptoms, inspect the temporary restoration, and decide how to protect it against normal biting forces.
At the follow-up, expect a review of your symptoms and bite, an examination of the tooth, and a discussion about the final restoration. Molars and premolars often need a crown or onlay because they absorb substantial chewing pressure. A front tooth may sometimes need a different restoration, depending on how much tooth structure remains.
Why the restoration changes the recovery story
A temporary filling is designed for short-term protection. It isn't a permanent answer for a tooth weakened by decay, an access opening, and the treatment itself. Continuing to chew hard foods on that tooth before the final restoration can turn manageable recovery into a fracture or loss of remaining tooth structure.
The permanent restoration appointment may involve reshaping the tooth, taking an impression or digital scan, and placing a temporary crown while the final crown is made. Your dentist will determine the sequence based on the tooth, the amount of remaining structure, the bite, and whether the tooth has settled clinically.
Radiographic healing takes longer than pain relief. A Harvard Dental School analysis found that many periapical lesions need at least 6 to 12 months to show radiographic signs of healing, and complete radiographic resolution can take several years. In that dataset, success was 75% at 6 months to 1 year, 83% after more than 1 year, and 80% after more than 3 years. These figures come from the Harvard analysis of endodontic outcomes, and they illustrate why an asymptomatic tooth may still be monitored.
Long-term outcome depends on more than whether the pain stopped. The tooth needs an effective seal, appropriate restoration, good oral hygiene, and follow-up when your dentist recommends it.
Warning Signs That Mean You Should Call the Dentist Now
A tender tooth that improves each day usually fits normal recovery. Pain that intensifies, swelling that spreads, or a bite that still feels clearly wrong needs a call to the dental office. Symptom relief can come quickly, while the tooth still needs time to settle and receive its permanent restoration. Use the trend as your guide: steady improvement is reassuring, worsening or persistent problems are not.
Call promptly if you notice any of these signs:
- Pain that escalates: Pain that worsens after the early healing period, especially when the recommended medication does not control it, needs assessment. The American Association of Endodontists advises contacting the dentist about severe or persistent pain and pressure in its post-treatment care guidance.
- Visible or spreading swelling: Increasing swelling in the face, cheek, or gums should not be watched at home. Swelling moving toward the eye or neck, or swelling that makes opening your mouth difficult, requires urgent attention.
- Fever or feeling unwell: A measured fever, chills, or worsening illness alongside dental pain warrants a call.
- An uneven bite: If the treated tooth hits first or feels high after the temporary restoration is placed, contact the dentist. Excess pressure can keep the supporting tissues irritated, and a bite adjustment may be needed.
- A lost restoration: Call if the temporary filling or crown loosens, cracks, or falls out. Keep the exposed tooth out of chewing until the office advises you.
- Drainage or a bad taste: Pus, persistent drainage, a gum pimple, or a foul taste near the treated tooth may indicate ongoing infection. Review this guide to dental abscess symptoms and treatment and the BacteriaFAQ.com on post-root-canal abscess, but neither resource replaces an examination.
- Numbness that persists: If feeling has not returned within the period your dental team described, call so the office can document and evaluate it.
Persistent pain is real, and it does not automatically mean the treatment failed. This clinical discussion of persistent pain after root canal treatment reports persistent pain in roughly 3% to 12% of cases, with some studies finding 5% of patients still had pain after six months or longer. Possible causes include bite trauma, missed anatomy, retreatment needs, or pain referred from another source. Stronger medication alone will not identify the cause.
Give the receptionist a precise summary: “I had a root canal on [date]. The treated tooth has had [specific symptom] for [duration]. It is [improving, unchanged, or worsening], and I've tried [medication or other care].” Mention swelling, fever, drainage, a lost filling, or an uneven bite. This helps the team triage the visit efficiently.
Paul L. Gregory, DDS provides endodontic treatment, restorative care, crowns, digital diagnostics, and urgent dental assessments. If recovery is worsening or a restoration is damaged, visit Paul L. Gregory, DDS to request an evaluation in Midtown Manhattan.